Friday, June 27, 2014

Make your Pendrive or USB Stick bootable drive for any OS

Steps:

1. Attache your Pendrive or USB Stick and FORMAT as FAT32.

2. Download Universal USB Installer

3. Run it and click on Agree.

4. Select your OS from DropDown List that you want to make bootable USB.

5. Browse your OS ISO file from your System. (Note: For this you must have ISO extension file only.)

6. Select your USB or Pendrive Letter very carefully.

7. Click on Create, Process will be start, Wait for while untill it finish.

Now your ready to install your OS from USB or Pendrive...

How to fix "unfortunately the process android.process.acore has stopped" error on Android Device

Steps:

1. Disconnect your device from INTERNET. Before solve this error you must have to care about your contacts, for that do as below steps...

2. Log in your Gmail Account from PC or LAPTOP.

3. Select CONTACT Menu from left side top where GMAIL is selected, click on it and select it.

4. Click on MORE option and select EXPORT.

5. Select option ALL CONTACTS and select below option as per your requirement. Google CSV format recommended.

6. Now go to SETTINGS > APPLICATION > ALL > CONTACT STORAGE > CLEAR DATA and FORCE STOP.

Hope your error has been solved, now connect your device with internet and go to your ACCOUNT SETTING select GMAIL ACCOUNT and click on SYNC CONTACT that's all...

Wednesday, January 22, 2014

Add new destinations to the 'Send to' menu in Windows 8

With a simple Run command, you can quickly and easily customize the right-click "Send to" menu.

The right-click "Send to" menu option is a great tool for sending files to and fro in Windows 8, and there is a simple way to add new destinations to it. Use the Win-R keyboard shortcut to call up the Run command window and type shell:sendto and hit enter or click OK. This calls up the SendTo folder where the right-click "Send to" menu destinations reside. You can delete any of the default shortcuts here, and you can drag in new shortcuts.
If you are one to mix up his or her Send To destinations frequently, you can skip the Run command step to add a new Send To destination. As pointed about by LifeHacker commenter Estefano Gomes, you can add a SendTo shortcut to the SendTo folder in a bit of an M.C. Escher-falling-in-on-itself move.
To set it up, you must first open the SendTo folder. Next, drag the SendTo item from the breadcrumb trail in the location bar down into the folder itself. This action creates a "SendTo - Shortcut" item in the folder. With this shortcut added, you will no longer need to open the SendTo folder to add an item to it. Instead, when you encounter an item you'd like to add as a destination to the "Send to" menu, simply right-click on the item and from the "Send to" menu, choose this shortcut you created. The item will get added to the SendTo folder and, thus, the right-click "Send to" menu.

Tuesday, January 21, 2014

Update Galaxy S2 I9100 To Android 4.4.2 KitKat via Omni ROM

Warning!
This tutorial is only for Galaxy S2 I9100. Don’t try this guide on any other Android device. Also, we are not responsible for any damage caused due to the instruction given in this page. Try this at your own risk. However, it is very unlikely that your device will be damaged if you follow all the instructions as it is which are mentioned in procedure.  
Pre Requisites:
1. Backup your device data. You can follow our ultimate backup guide.
2.  Make sure your device have at least 60% battery power. You can install an app like Battery Notifier BT Free on your Android device to check it easily.
3. You already have USB Driver Installed for Galaxy S2 I9100 in your PC. [Download USB Drivers]
4. Make sure USB Debugging is enabled otherwise you won’t able to transfer file between PC and Galaxy S2 I9100. [Guide].
5. Your device have latest CWM version 6.0.4.4 and up or TWRP 2.6.1 and up installed. [Guide]
If you done everything that we mentioned above then you are ready to follow step-by-step guide on how to install Android 4.4.2 KitKat based OmniROM on Galaxy S2 I9100.
File Required(Download by clicking on it)
  1. Omni Android 4.4.2 KitKat ROM For Galaxy S2 I9100 [Filename: omni-4.4.2-20131215-i9100-NIGHTLY.zip]
  2. Google Apps [Filename: gapps-kk-20131119.zip]

How to Install Android 4.4.2 KitKat based Omni ROM on Galaxy S2 I9100

  1. Connect your device to PC using USB cable and then copy downloaded files to the SD card of your device. Important: Don’t extract any files.
  2. Disconnect USB and then turn off your Galaxy S2 I9100.
  3. Now, boot into recovery mode. To do so, press and hold Volume Up, Home and Power button together until Samsung logo flash twice and then leave the button. You should see recovery menu soon. In recovery use Volume Keys to navigate between option and Power or Home Key to select an option. Alternatively try this: Recovery Mode without Key Combination.
  4. Perform a Nandroid backup of your existing ROM that you can restore later if this new ROM not work or you want to go back into your previous ROM. To perform a backup, select Backup and Restore, then on the next screen, select Backup again. Go back to main recovery menu after backup is complete.
  5. Now, perform data wiping task. To do so, select wipe data/factory reset, then select Yes on next screen to confirm your action. Wait few minutes till the data wipe is complete. Now come back to CWM recovery main menu. Select wipe cache partition and after wiping process done, select Wipe Dalvik Cache under advance option to perform Dalvik cache wiping.
  6. Select install zip from sdcard, then select choose zip from sdcard. Now, locate the OmniROM Zip file that you copied earlier in Step 1 and select it by pressing Power button. Confirm installation by selecting Yes – Install _____.zip on the next screen. The ROM installation will begin.
  7. Once the ROM installation process end, repeat the step 6 but choose the gapps-kk-20131119.zip file instead of ROM zip to install the Google apps package.
  8. When installation is completed, go back to the main recovery menu and select reboot system now to reboot your Galaxy S2 I9100 and boot up into rooted Android 4.4.2 KitKat ROM Omni
  9. Returning to Previous ROM: To go back to your previous ROM, boot into recovery, select backup and restore then restore your previous ROM by selecting it from the list.
Congrats! Android 4.4.2 KitKat firmware based custom ROM Omni is now installed and running on your Galaxy S2 I9100.

Saturday, December 21, 2013

Windows 8.1 Activator

Steps:

Download Activator
1. Install
2. Run As Administrator to work
3. Click Uninstall Product Key
4. Click "Update Server" to Update KMS Server
5. Click on which version of Windows you
   Done, Enjoy

Wednesday, November 20, 2013

Speed up torrent download speed or Increase speed of torrent download speed (100% works)

Now you are ready for increase torrent Download speed

You can apply these Setting to uTorrent and BitTorrent.Most poeple use uTorrent thats why i choose uTorrent For this Tutorial to show how to change settings.But you can apply same settings to BitTorrent. Ok let's Start!!


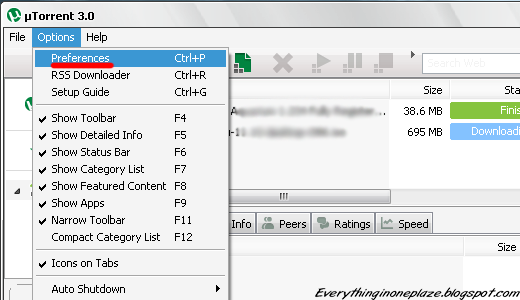
  • Click on "Option"
  • Go to "Preferences"

Speed Up uTorrent, BitTorrent


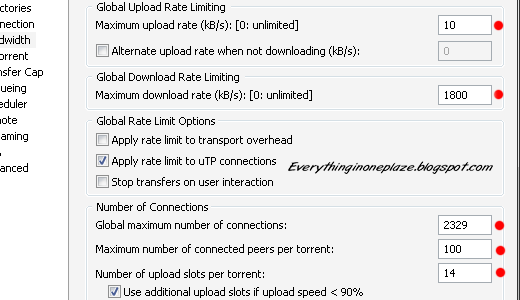
  • Click on "Bandwidth"

Speed Up uTorrent, BitTorrent

  •  Set
    Maximum Upload Rate : ------------------------------- [ 10 ]  or  [ 15 ]
    Maximum Download Rate : ---------------------------- [ 1800  ]
    Global maximum number of connections : ------------- [ 2329 ]
    Maximum number of connected pees per torrent : ---- [ 100 ] or not more than [ 300 ]
    Maximum upload slots per torrent : -------------------- [ 14 ]                         
  • Leave rest Default

Speed Up uTorrent, BitTorrent

Now  final step
  • Click on "Advanced"
Speed Up uTorrent, BitTorrent

  • Look for "bt.connect_speed" Set it to "80"
  •  Look for "net.max_halfopen" Set it to "100"
    Now All DoNE!! Click on "Apply"
    Exit the uTorrent Application and re Run it.......Feel the new speed
    (Check out the screen shot below)


Speed Up uTorrent, BitTorrent

Friday, November 8, 2013

Download youtube videos without any software

If you want to download video from youtube then you can download it now without any software... just search for that video in youtube, after search it goto on address bar and just add "ss" in URL. Eg.: My video url is "www.youtube.com/ads=sdfmaf" then just add "ss" to "www.ssyoutube.com/ads=sdfmaf" rest remain as it is... thatz all !!! and hit ENTER and there will be links on right side of the screen with pixels like 380p, 480p, 720p, 1080p, etc... just click on it on ur requirement pixels quality and download it... Enjoy (y)